
Floating is not automatically the best way to install engineered wood. This engineered timber flooring installation guide starts with the board, subfloor and moisture conditions, not a preference for nails or glue.
The best installation method is one approved for both the flooring and the subfloor. Engineered hardwood flooring installation can involve floating, full-spread adhesive or mechanical fastening. The board’s joint profile, construction and installation instructions determine which options apply. In this guide, engineered timber, engineered wood and engineered hardwood describe the same flooring category: a real-wood surface bonded to a supporting core.
Underlay is not automatically required beneath every engineered floor. Floating systems use compatible underlayment unless the product specifies a different assembly, such as approved attached padding. Glue-down systems bond through a specified adhesive assembly. Nailed systems require an approved wood subfloor and any specified underfloor layer.
Follow this project sequence before opening the first carton for installation:
A straightforward click-floor installation can suit an experienced DIY renovator. Slab moisture, extensive levelling, full-spread adhesive, radiant heat and stairs add technical risks. Those conditions can make professional preparation and installation better value than correcting damaged boards later.
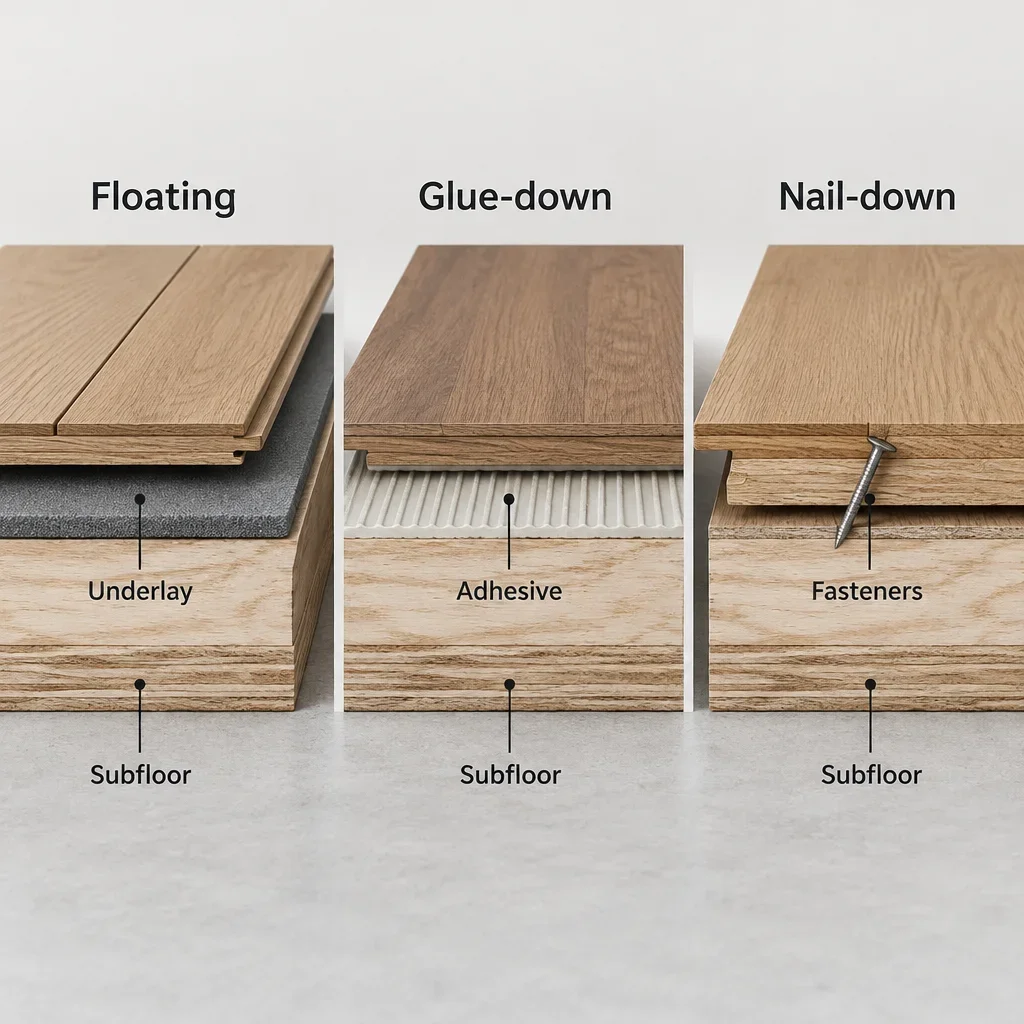
Click-fit and tongue-and-groove describe how board edges connect, not where the boards can be installed. A tongue-and-groove product might permit nailing, gluing or floating with joint adhesive. A click product might permit only a particular floating assembly. Do not infer installation approval from the joint’s appearance.
| Method | Approved board construction | Suitable subfloor | Underfloor system | DIY difficulty | Feel and sound | Cost drivers | Main limitations |
|---|---|---|---|---|---|---|---|
| Floating | Approved click boards or floating tongue-and-groove boards | Prepared concrete, wood or approved existing flooring | Compatible underlay and specified moisture-control layer | More approachable with simple layouts | Can sound more hollow because it is not bonded | Underlay, moisture control, transitions and preparation | Movement limits, flatness and fixed-obstruction clearance |
| Glue-down | Boards approved for full-spread bonding | Prepared concrete or approved wood assembly | Compatible adhesive, with specified primer or moisture-control system | Less forgiving | Bonded directly to the substrate | Adhesive, trowels, slab preparation and moisture treatment | Adhesive compatibility, working time and bond quality |
| Nail-down or staple-down | Mechanically fastened tongue-and-groove boards | Approved structural wood subfloor | Specified underfloor layer; glue-assist only when approved | Requires fastening-tool experience | Mechanically connected to the wood substrate | Fasteners, tool rental, repairs and possible glue-assist | Not a direct-to-concrete method; board and subfloor restrictions |
Joint glue and full-spread adhesive perform different jobs. Joint adhesive connects boards in an approved floating tongue-and-groove system. Full-spread adhesive bonds flooring to the substrate. Do not add joint glue to click-lock flooring unless its instructions expressly require or permit it.
The best underlay for engineered wood flooring supports the joint without excessive compression. Thicker or softer padding is not automatically better. In condos, acoustic performance belongs to a tested floor assembly, not just an underlay label. With radiant heating, the assembly’s thermal resistance also matters.
A floating floor must remain free to move. Fixed cabinetry, island bases, tight transitions or trim fastened through the boards can restrain it. That restraint can contribute to lifted joints or buckling even when the boards were assembled correctly.

Engineered wood’s layered construction improves dimensional stability compared with comparable solid wood, but it does not make the floor waterproof. Below-grade moisture, plumbing leaks and standing water remain installation and ownership risks.
| Room or substrate | Main risk | Potential installation route | Required preparation or approval |
|---|---|---|---|
| Living room or bedroom over plywood or OSB | Panel movement, squeaks or unevenness | Approved floating, glue-down or mechanical fastening | Sound, secure panels; acceptable flatness and moisture |
| Kitchen | Leaks, spills and fixed cabinetry | Room-approved flooring and method | Plan appliance access, island sequencing and spill management |
| Concrete basement | Slab moisture and below-grade dampness | Below-grade-approved floating or glue-down assembly | Concrete moisture testing and compatible moisture control |
| Bathroom or laundry room | Repeated wetting or appliance leaks | Only a specifically approved product and assembly | Assess whether another flooring category better suits exposure |
| Radiant-heated room | Heat cycling and excessive drying | Complete heating-compatible flooring assembly | Compatible boards, adhesive or underlay, plus controlled operation |
| Existing floorboards | Loose boards, movement and unevenness | Approved overlay assembly | Secure and repair boards; add an approved substrate layer if needed |
| Existing tile | Loose tiles, contamination and height changes | Approved floating or bonded overlay | Sound bond, clean surface, suitable flatness and height clearance |
Plywood and OSB must provide a sound substrate for the selected fastening or bonding system. Existing floorboards need more than a visual inspection: loose boards, unsupported edges and movement must be addressed before covering them. Typical engineered planks are not structural decking and should not bridge exposed joists.
Installing engineered hardwood over concrete requires a tested moisture strategy. A slab can look dry while transmitting moisture into the flooring assembly. Floating and glue-down systems handle that risk differently, so the moisture-control layer must suit the chosen system.
Radiant-heat suitability depends on the complete assembly: flooring, heating system, adhesive, underlay and operating procedure. Controlled temperature changes matter because heating can dry the wood unevenly. Toronto’s dry heated winters and humid summers also make ongoing indoor climate control part of floor care.
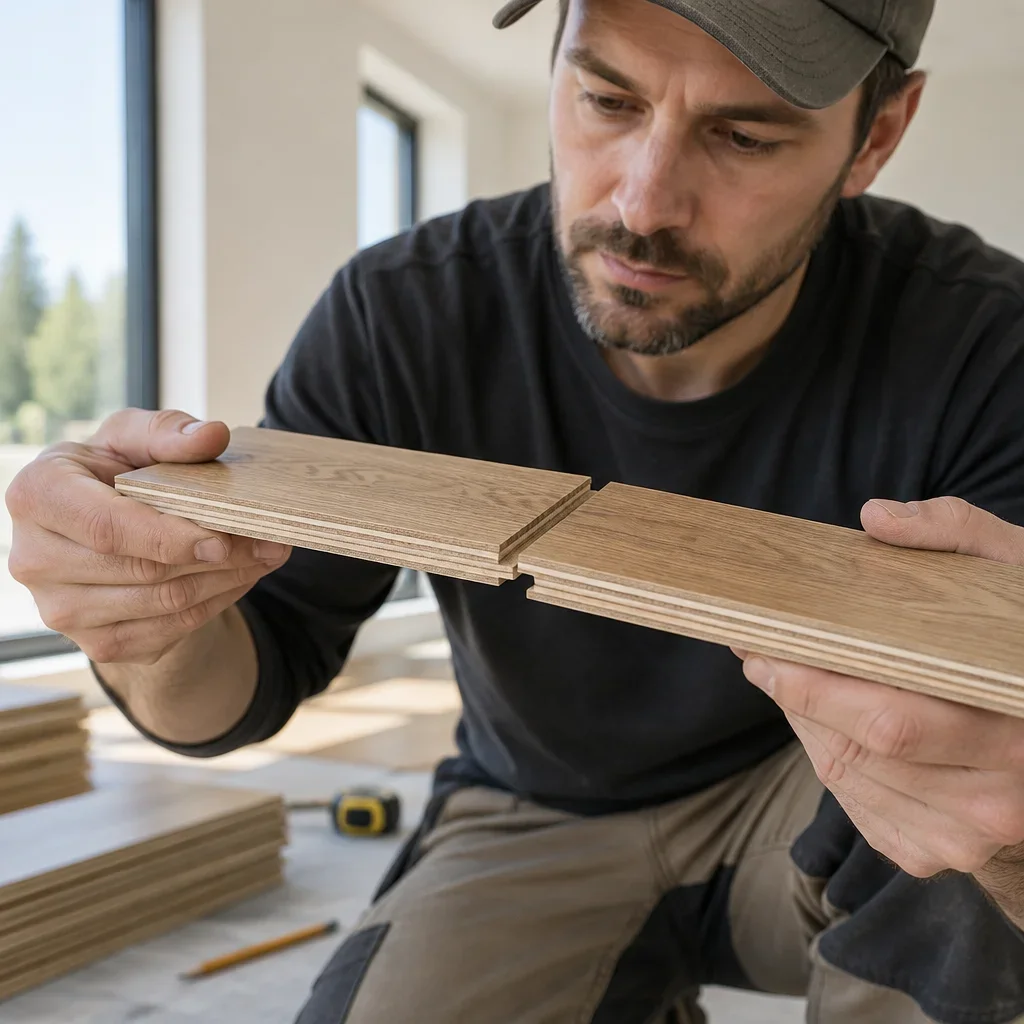
Choose engineered boards by construction, joint fit and installation approval, not appearance alone. Wear-layer thickness affects refinishing potential. Core material, total thickness, width and joint design affect installation compatibility. Manufacturing consistency and clear installation documentation matter alongside those specifications.
Wide-plank engineered hardwood deserves particular attention to substrate preparation and fastening approval. Some wide boards require or permit glue-assist with mechanical fastening. Others use a different approved assembly. Adding adhesive in an improvised pattern is not a substitute for following that system.
Engineered wood offers a real-wood surface with layered support. Solid hardwood is wood through its thickness and has different movement and installation considerations. Laminate uses a decorative surface over a core rather than a refinishable wood wear layer. None should be treated as interchangeable during installation.
Engineered flooring’s disadvantages include moisture sensitivity, surface dents or scratches, and product-dependent refinishing limits. A thicker wear layer alone does not guarantee sanding eligibility. The usable wood above the joint, previous sanding, surface texture and floor condition also matter.
Inspect the delivery before installation makes defects harder to separate from workmanship:
Calculate flooring quantities from the area actually being covered. Divide irregular rooms into rectangles, calculate each area and add the results. Apply a layout-specific cutting allowance, then round up to full cartons. Diagonal layouts, patterned floors and rooms with numerous interruptions create different waste requirements from a simple straight lay.
Hypothetical quantity example: a project covering 400 sq. ft. is approximately 37.2 m². Using an illustrative 10% cutting allowance gives 440 sq. ft.. If the hypothetical carton covers 22 sq. ft., the order is 20 cartons. These figures demonstrate the arithmetic, not a product’s actual coverage or a universal waste allowance.
Transitions, nosings, trim, underlay and installation consumables need separate quantities. Measure trim and transitions by length. Calculate adhesive, primer and moisture-control materials from their specified coverage for the substrate and application method. Flooring area alone does not capture those requirements.
Toronto installation costs depend on the preparation and installation scope, not just floor area. Removing carpet over sound plywood is a different project from removing bonded flooring, repairing a slab and managing moisture. Compare quotes with matching inclusions rather than comparing a single installed-price headline.
| Cost component | Useful pricing or quantity basis | What the scope should identify |
|---|---|---|
| Flooring material | CAD per square foot or square metre; full cartons | Exact product, coverage and material-only price |
| Cutting allowance | Additional cartons | Layout assumptions and spare material |
| Removal and disposal | Area, material and disposal scope | Existing flooring layers, adhesive removal and debris handling |
| Subfloor repairs | Defined repair area or separately scoped work | Loose panels, damaged boards and structural concerns |
| Flattening | Measured area and preparation requirements | Grinding, patching, levelling and compatible primers |
| Moisture control | Area and specified assembly | Test results, substrate preparation and treatment |
| Underlay and adhesive | Roll or container coverage | Exact compatible products and seam materials |
| Tools and protection | Purchase or rental | Saws, fastening tools, extraction and protective equipment |
| Installation labour | Area and method | Layout complexity, access and fastening or bonding method |
| Stairs and transitions | Separately measured scope | Nosings, profiles, attachment and height changes |
| Trim | Linear measurement | Supply, removal, installation and finishing |
| Delivery and taxes | Separate quote lines | Delivery arrangements and applicable taxes |
DIY can reduce purchased labour, but it adds tool rental, preparation work and error exposure. Active installation is only part of the schedule. Room conditioning, subfloor repairs, moisture treatment and adhesive curing can determine when the room becomes usable.
Shared tools must support measurement, cutting, preparation and site assessment. A hygrometer measures ambient humidity; a suitable wood moisture meter assesses wood moisture content. Concrete readiness requires a concrete test method accepted by the flooring and adhesive system, not a wood-meter reading used as a substitute.
Cut engineered wood with the board fully supported and a suitable sharp blade. Make a test cut to establish the cleanest orientation for the saw and finish. Blade travel differs between tools, so a universal “finished face up” instruction can produce chipped edges. Keep dust extraction connected and protect installed surfaces from cutting debris.
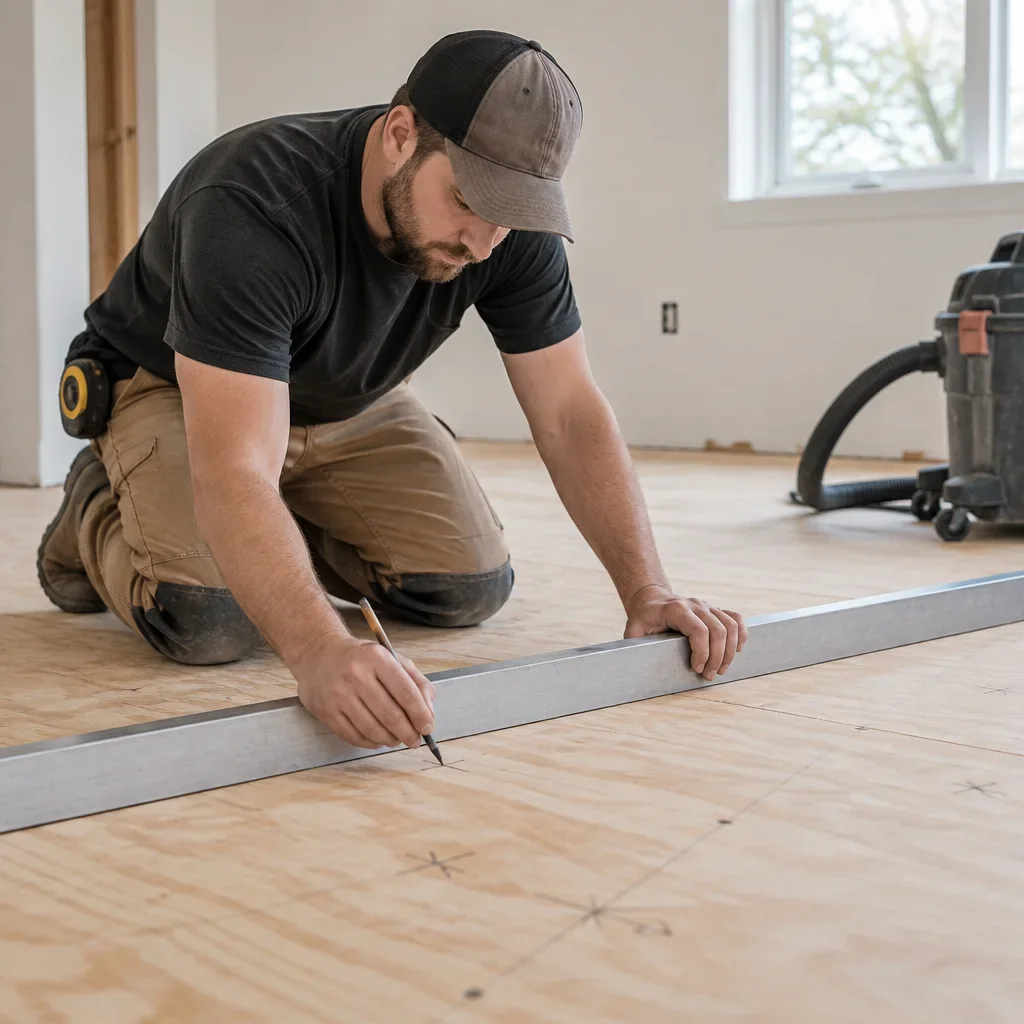
A flat floor is not necessarily level, and a level floor is not necessarily flat. Flatness describes local surface variation. Levelness describes slope. The selected flooring system’s flatness requirement governs preparation; cushioning underlay does not correct humps or depressions.
Use this preparation sequence before laying engineered hardwood:
Concrete moisture testing and wood moisture testing answer different questions. Wood assessment measures moisture content in the boards or wood substrate. Accepted concrete tests assess slab conditions relevant to the flooring assembly. Acceptance limits must match the flooring, adhesive and moisture-control system; slab age and visual dryness are not substitutes.
Existing tile must be firmly bonded, clean and suitable for the proposed overlay. Adhesive residue, sealers and surface contamination can prevent bonding. Existing floorboards require repairs where movement could transfer through the new floor. Added flooring height also affects doors, appliances and transitions.
Stop installation for active leaks, unresolved dampness, unstable substrates or suspected hazardous legacy materials. Covering those conditions does not resolve them. Underlay and moisture-control products cannot compensate for an active water source or a failing substrate.
Acclimation is a readiness process, not simply a waiting period. Complete wet work, operate the home’s heating or cooling system, and establish the product’s required indoor conditions. Store cartons using the specified handling procedure; opening and stacking requirements differ between products.
Record room conditions and relevant material readings before installation. Elapsed delivery time alone does not establish readiness. The flooring and substrate must meet the selected system’s requirements, and those conditions need to remain controlled after installation.
Year-round climate management reduces seasonal wood movement. Excessive winter dryness can contribute to gaps, while summer humidity can increase expansion. Engineered construction reduces movement compared with comparable solid wood, but it does not eliminate the need for indoor humidity control.
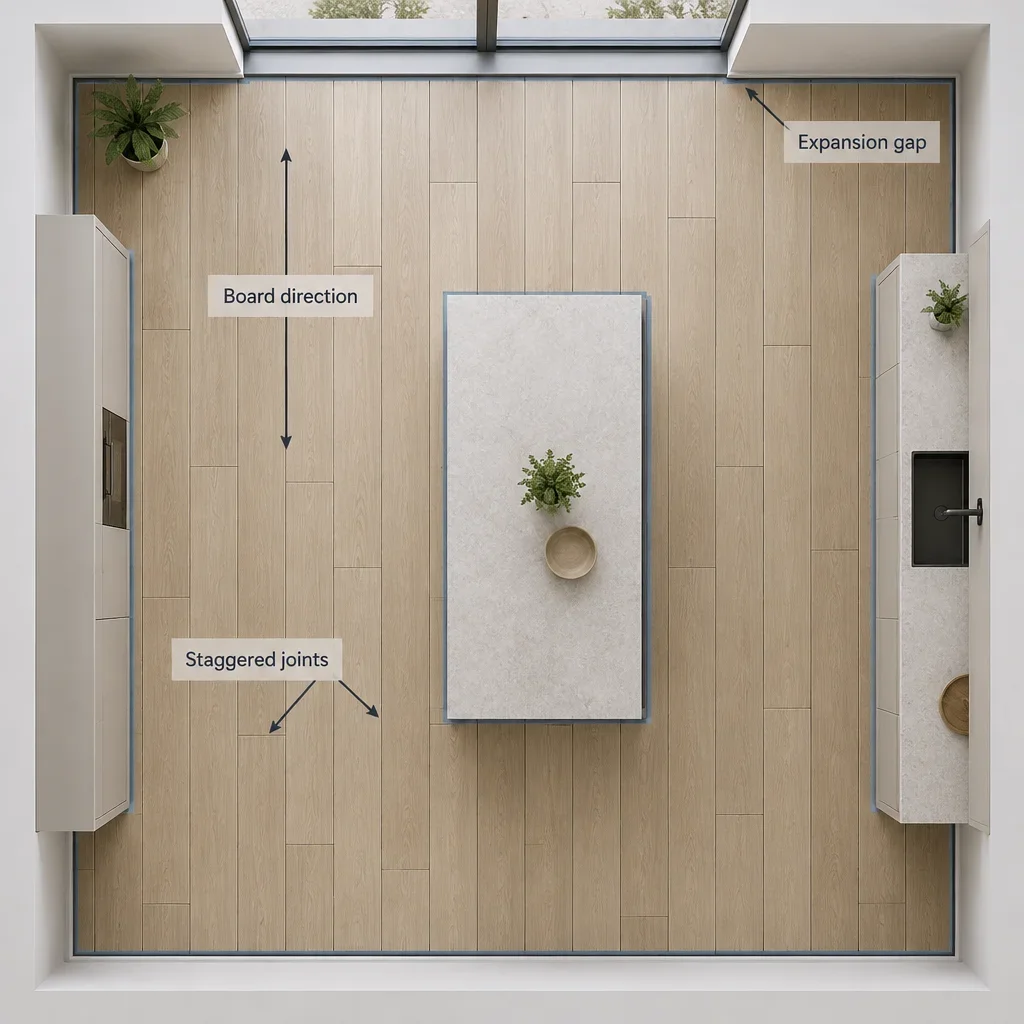
Choose plank direction after considering substrate construction and product instructions. Those requirements can override aesthetic preferences. Once the assembly permits a choice, use room shape, long sightlines, connected spaces and doorway positions to guide the layout.
Calculate row widths before fixing the starting line. Subtract the required expansion allowances from the room width, then divide by the board’s face width. The remainder identifies the final-row width. Adjust the starting row if the result would leave an undersized strip, while respecting the product’s minimum row width.
Stagger end joints according to the board’s documented requirements. Distribute board lengths to avoid repeated stair-step patterns or aligned H-joints where prohibited. The phrase “rule of 3” has no single universal meaning for engineered flooring; it cannot replace the specified end-joint offset.
Straight-lay, herringbone and chevron are different installation layouts. Patterned floors require suitable board geometry and a dedicated setting-out plan. Standard straight-lay boards should not be assumed suitable for a patterned installation.
Expansion space belongs around walls and fixed obstructions, including pipes, columns and island bases. Doorway breaks and maximum uninterrupted floor runs also depend on the product. Plan those details before installation rather than trying to hide insufficient movement space beneath trim.
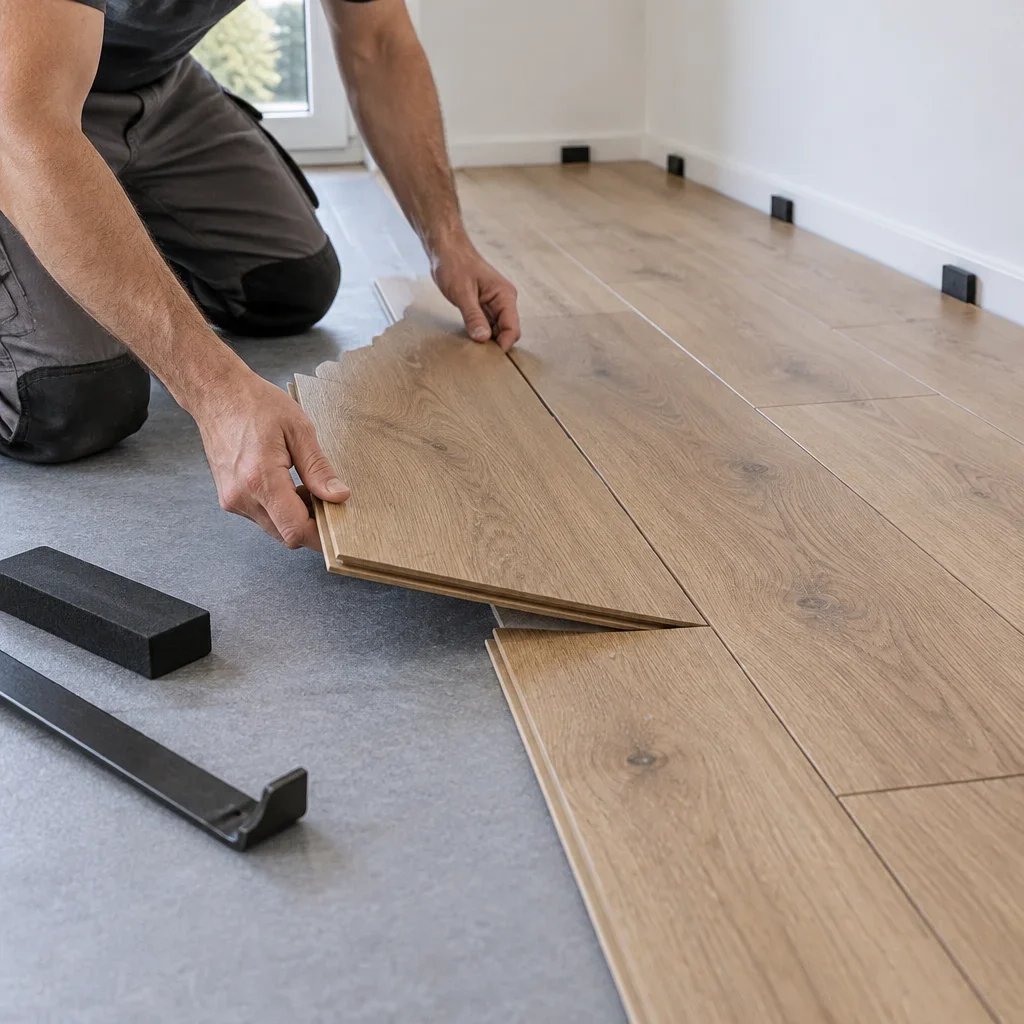
A floating floor connects board to board without fastening the flooring field to the substrate. Begin only after moisture, flatness and conditioning requirements are satisfied. The locking sequence must match the joint design; forcing an incompatible movement can damage the connection.
Installing underlayment correctly means following the specified seam arrangement, not overlapping or taping layers by habit. Foam seams and moisture-barrier seams can require different treatment. Keep the assembly free of folds, trapped debris and incompatible additional cushioning.
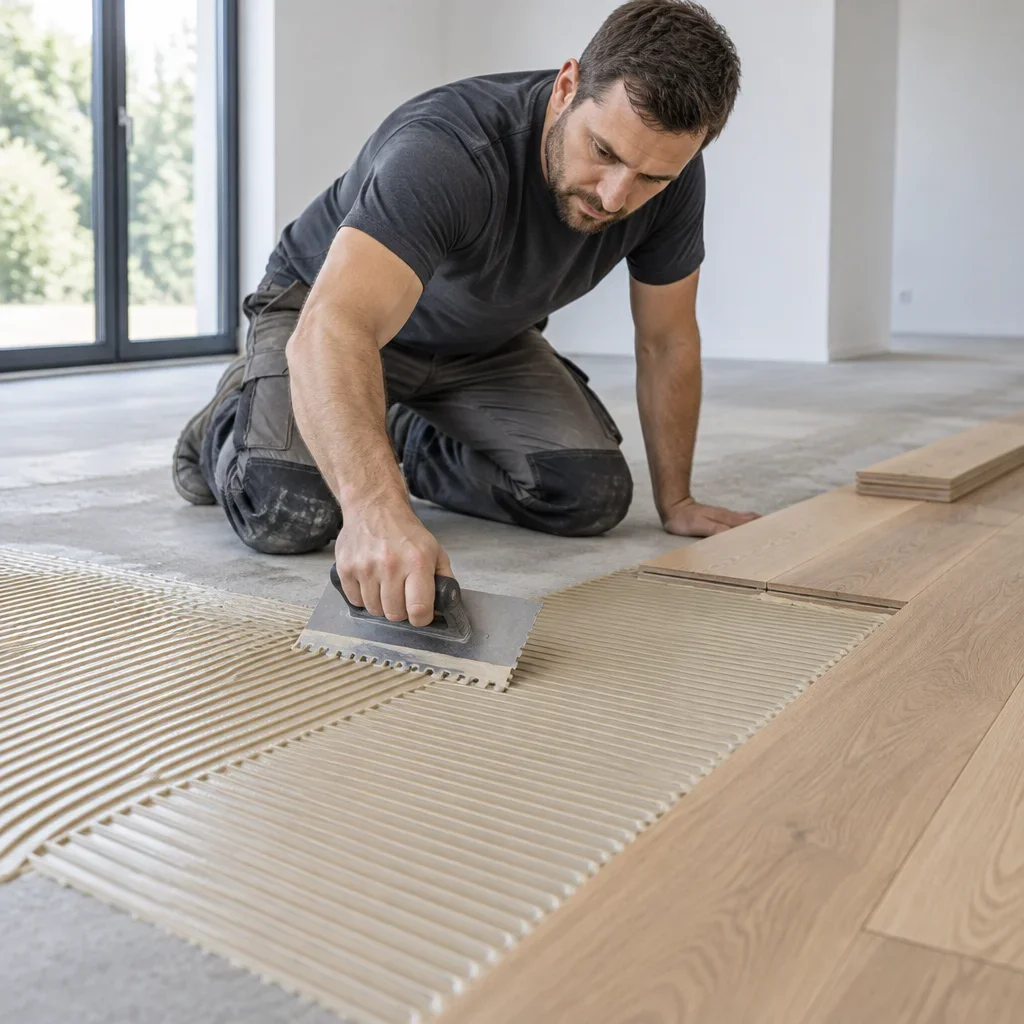
Full-spread installation bonds the boards to a prepared substrate. Adhesive choice must account for the flooring, substrate and measured moisture conditions. A moisture-control claim on an adhesive container does not mean it can handle every slab condition without additional treatment.
Trowel profile, adhesive condition and placement timing control bond quality. Adhesive left beyond its usable working period may not transfer correctly. This makes glue-down less forgiving for a first-time installer than a straightforward click-floor project.
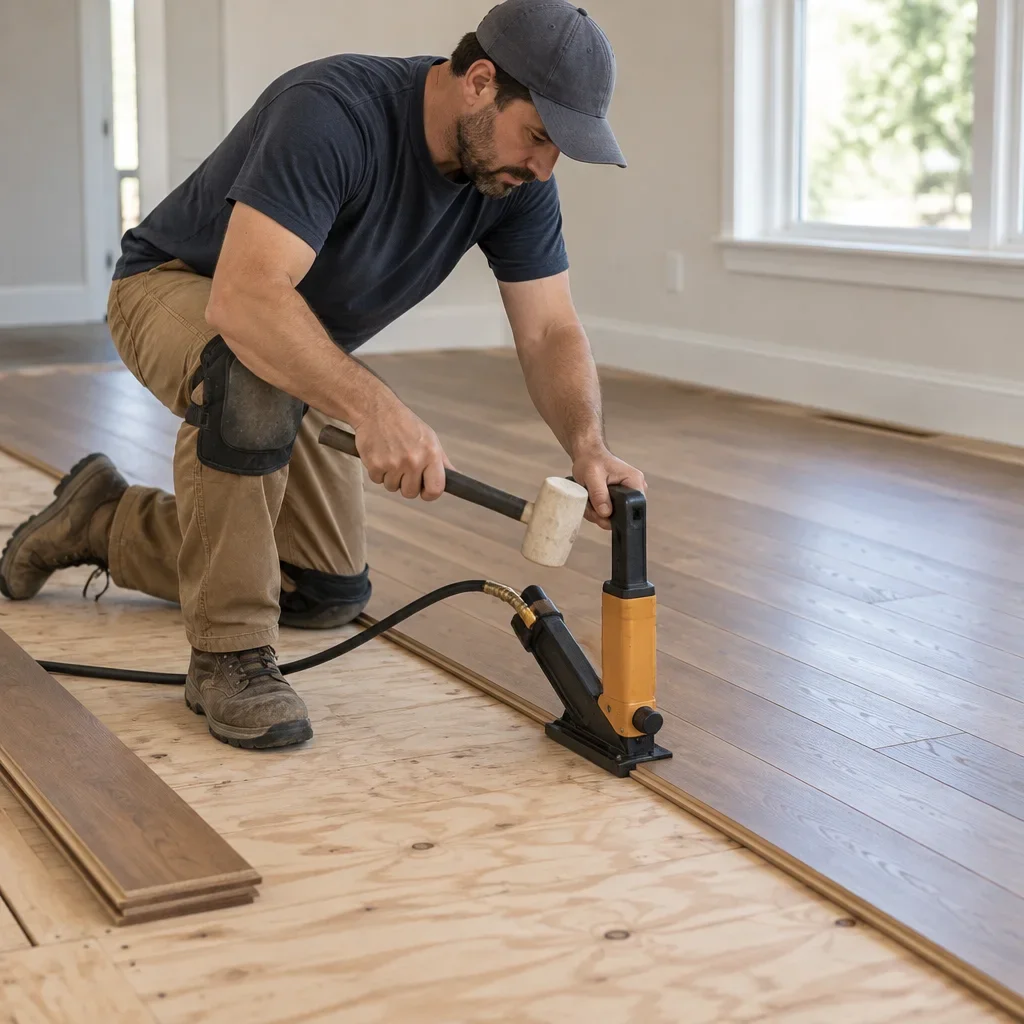
Mechanical fastening requires boards and a wood-subfloor assembly approved for that method. Cleats and staples are not interchangeable by assumption. Fastener dimensions, placement and tool settings must suit the board and substrate. This is not a direct-to-concrete installation method.
Wide-plank glue-assist supplements an approved fastening system; it is not automatically equivalent to full-spread bonding. The adhesive, placement pattern and substrate preparation must work together. Improvised adhesive application can leave inconsistent support or conflict with other underfloor materials.
Undercut suitable door jambs so the flooring can fit beneath them while retaining hidden expansion clearance. Check door swing and appliance access against the finished floor height. Around pipes and irregular obstructions, cut for both fit and movement rather than making a tight decorative opening.
Fixed islands and cabinetry must not restrain a floating floor. Plan their installation sequence and leave the required clearance around fixed bases. Attach baseboards and shoe moulding to the appropriate vertical surface, not through the floating boards.
| Transition condition | Potential profile | Installation consideration |
|---|---|---|
| Similar-height floor surfaces | T-moulding | Preserve the required movement space beneath the profile |
| Engineered floor meeting a lower surface | Reducer | Match the height change and secure without restraining a floating floor |
| Flooring ending at a suitable vertical edge | End cap | Allow the specified clearance and safe edge detail |
| Flooring meeting stairs | Compatible stair nosing | Use a secure stair assembly, not a floating tread |
Stairs are a separate installation assembly. Treads and nosings require compatible components and secure attachment; do not float boards on stair treads. Changes in floor thickness and nosing design can affect stair geometry, making staircase planning a strong candidate for professional installation.
Return-to-use timing follows the installation system, not a universal calendar. Floating systems, joint adhesives, full-spread adhesives and preparation products have different restrictions. Permission for light foot traffic does not automatically include heavy furniture, rugs or protective coverings.
A newly installed floor can produce symptoms with different causes. Hollow sound alone does not establish failure in a floating assembly. A similar sound in a glued floor may require bond assessment. Use the installation method and moisture history to guide diagnosis rather than assuming every noise has the same cause.
| Symptom | Possible causes | Initial assessment | Appropriate next action |
|---|---|---|---|
| Squeaks or creaks | Subfloor movement, debris, joint friction or fastening issues | Note locations and whether movement accompanies the sound | Assess the substrate and installation assembly before repair |
| Hollow sound | Floating-floor acoustics, uneven support or a glue-down bond concern | Identify the method and whether boards move | Obtain an installation assessment if movement or bond loss is suspected |
| Gaps | Seasonal dryness, incomplete assembly or installation movement | Review indoor conditions and joint pattern | Address the cause before attempting gap repair |
| Buckling or lifted boards | Moisture, restricted movement or inadequate expansion clearance | Look for leaks, fixed restraints and perimeter pressure | Stop loading the affected area and arrange assessment |
| Cupping or crowning | Moisture imbalance or changing moisture conditions | Review leaks, slab conditions and climate history | Resolve moisture causes before considering surface correction |
| Damaged joints | Forced assembly, uneven support or impact | Identify cracking, separation and local deflection | Assess board replacement and the underlying cause |
| Adhesive residue | Delayed cleaning or unsuitable cleaning products | Identify adhesive and finish compatibility | Use the specified removal approach; avoid improvised solvents |
The costly mistakes are skipping moisture tests, treating underlay as levelling, pinning floating boards and ignoring adhesive timing. Sanding cupped or crowned flooring before understanding the moisture cause can also remove usable wood without solving the problem.
Neither method is universally better. Nailing requires an approved wood substrate and mechanically fastened board. Floating avoids fastening the field to the substrate but requires compatible joints, suitable underlay and freedom to move.
Glue joints only when the approved system calls for it. Some floating tongue-and-groove floors require joint adhesive. Click-lock joints should not receive glue unless the product expressly specifies it.
The best underlay is compatible with the board and assembly. Compression resistance, acoustic requirements, moisture control and radiant-heat compatibility matter more than thickness alone.
Both can be suitable substrates for approved systems. Concrete requires accepted moisture assessment. Tile must be sound, clean and suitably flat, with the added floor height accounted for.
There is no universal acclimation duration. Readiness depends on the product’s conditioning procedure, stable room conditions and acceptable flooring and substrate readings, not elapsed time alone.
This phrase is ambiguous rather than a universal engineered-floor installation standard. Use the flooring’s documented joint-stagger requirement and layout restrictions instead.
An approved click system over a prepared substrate is more approachable than full-spread adhesive or staircase work. Moisture problems, extensive flattening and complex transitions increase the technical demands.
Radiant installation requires approval for the complete assembly. Board construction, heating operation, adhesive or underlay compatibility and controlled temperature changes all affect suitability.
Engineered wood can scratch, dent and suffer moisture damage. Installation options and refinishing potential also differ by construction. Layered support improves stability without making wood waterproof.
Use the finish’s approved cleaning method, with a lightly damp approach where permitted. Avoid soaking the surface, standing water and unapproved steam cleaning.
Some engineered floors can be refinished; others cannot tolerate conventional sanding. The remaining usable wood above the joint, previous sanding, surface treatment and condition determine the options.
Engineered flooring has no single defensible lifespan across all products. Wear-layer construction, installation quality, moisture exposure, traffic and care determine how long it remains serviceable. Replacement can become necessary because of joint or moisture damage even when the surface still has usable wood.
We supply and install engineered flooring in the GTA, including projects with stairs. For a scoped quote, bring approximate floor area, project location, existing flooring details, known subfloor type, stair requirements and preferred timing. The useful comparison is a complete scope covering supply, preparation, installation, accessories and disposal where included.
Visit CanFloor at 2687 Steeles Ave. West, North York, Ontario to compare engineered flooring samples and discuss the installation assembly. Start with suitable boards and a prepared substrate. The finish comes after those decisions, not before.